How to train your pixies
January 30, 2019 - Words by Tadej Borovšak - 7 min read

Setting up a preboot execution environment (PXE) server is relatively straightforward task once you know how various pieces fit together. But setting it up for the first time can be quite a challenge. And if you think “Hey, there are already countless semi-working tutorials on the internet”, well, we have got some good news for you: ours is fully-working ;)
What is this PXE you are talking about
For those of you who have never heard about PXE: it is an environment consisting of
- dynamic host configuration protocol (DHCP) server and
- trivial file transfer protocol (TFTP) server.
Combination of both servers allows us to boot operating system over a network.
In order for this process to work, network interface controller (NIC) needs to have support for PXE built-in, but this is true for almost any network adapter on the market today.
If you are in a hurry or you just do not care about the inner workings of the PXE, you can skip to the PXE server setup section and get your hands dirty now. We will only judge you a little bit ;)
The rest of us will take a little detour and have a closer look at how PXE components actually work together.
What pixies do
If our computer is set to boot over the network, there are a couple of steps taken by the computer’s NIC when we power it on.
It all starts when computer’s NIC broadcasts DHCPDISCOVER packet that contains PXE-specific parameters in its request list. The two most important ones are TFTP server name and Bootfile name. They tell the DHCP server that it should send the TFTP server address and path to the network bootstrap program (NBP) in the response. Relevant parts of the DHCPREQUEST packet are shown in the next listing, copied from the Wireshark.
Bootstrap Protocol (Discover)
    Client IP address: 0.0.0.0
    Your (client) IP address: 0.0.0.0
    Next server IP address: 0.0.0.0
    Boot file name not given
    Option: (55) Parameter Request List
        Parameter Request List Item: (66) TFTP Server Name
        Parameter Request List Item: (67) Bootfile name
If the DHCP server is configured properly, it responds with the DHCPOFFER
packet that contains all the pieces of the requested information, including
the PXE-specific options that client requested. In the listing below we can
see the TFTP server can be reached at 10.10.10.10 and that the NBP program
path that should be downloaded and run is /pxelinux.0.
Bootstrap Protocol (Offer)
    Client IP address: 0.0.0.0
    Your (client) IP address: 10.10.10.24
    Next server IP address: 10.10.10.10
    Boot file name: /pxelinux.0
After the computer’s NIC and the DHCP server manage to seal the deal, NIC downloads the NBP from the TFTP server and boots into it.
What happens from here on is highly dependent on the NBP that was served to
the PXE client. In this post, we are using
PXELINUX
’s pxelinux.0, which
will, when started, try to fetch some auxiliary files from the TFTP server.
For example, our computer generates a list like this (revealed by the
Wireshark again):
Read Request, File: /pxelinux.cfg/00000000-0000-0000-0000-1c6f65d1a5b2
  Error Code, Code: File not found, Message: File not found
Read Request, File: /pxelinux.cfg/01-c4-6e-1f-00-5d-c6
  Error Code, Code: File not found, Message: File not found
Read Request, File: /pxelinux.cfg/0A0A0A18
  Error Code, Code: File not found, Message: File not found
Read Request, File: /pxelinux.cfg/0A0A0A1
  Error Code, Code: File not found, Message: File not found
Read Request, File: /pxelinux.cfg/0A0A0A
  Error Code, Code: File not found, Message: File not found
Read Request, File: /pxelinux.cfg/0A0A0
  Error Code, Code: File not found, Message: File not found
Read Request, File: /pxelinux.cfg/0A0A
  Error Code, Code: File not found, Message: File not found
Read Request, File: /pxelinux.cfg/0A0
  Error Code, Code: File not found, Message: File not found
Read Request, File: /pxelinux.cfg/0A
  Error Code, Code: File not found, Message: File not found
Read Request, File: /pxelinux.cfg/0
  Error Code, Code: File not found, Message: File not found
Read Request, File: /pxelinux.cfg/default
  Option Acknowledgement
As can be seen from the list of requested files above, pxelinux.0 tries to
download a whole range of menu files from the pxelinux.cfg folder on the
TFTP server. This allows us to customize booting process of different
computers based on the things like NIC’s MAC or IP address as described in the
PXELINUX configuration
documentation.
Based on the contents of the menu file, PXELINUX will then download the kernel (and optionally initial RAM disk) from the TFTP server and boot it. What happens form here on is entirely in the hands of the operating system.
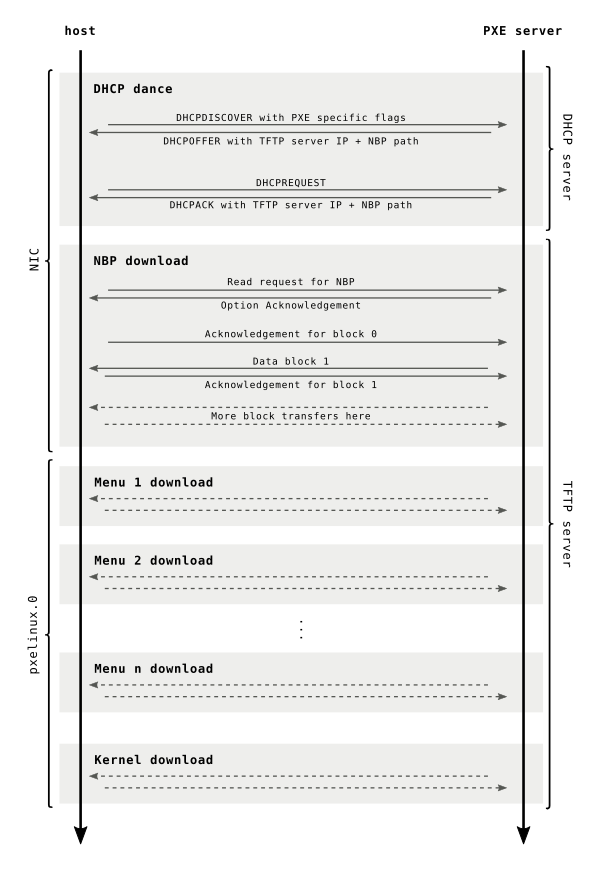
Graphical representation of PXELINUX boot process.
Wow, those pixies are quite a busy little creatures! Now that we know what they do, we can focus our attention on setting up a working PXE server that we can play with.
Building a castle for pixies
If we would like to have well-behaved pixies, we need to treat them with respect. And we will show respect by building them a castle!
Setting up a DHCP server in an existing DHCP’s network might have funny (or dire) consequences, so make sure your test environment is properly isolated from the mission-critical infrastructure.
We will use the latest stable CentOS 7 (7.6 at the time of writing) in order for you, our dear reader, to be able to follow along. The same steps should also work on RHEL , but we have not tested it.
We will start by installing a DHCP server. Fortunately for us, DHCP server package is readily available for CentOS, so all we need to do is run
# yum install dhcp
After this command terminates, we can configure our DHCP server by placing
something similar to next listing into /etc/dhcp/dhcpd.conf:
option domain-name "pxe.lan";

default-lease-time 3600;
max-lease-time 7200;
authoritative;

next-server 10.10.10.10;
filename "/pxelinux.0";

subnet 10.10.10.0 netmask 255.255.255.0 {
  option subnet-mask 255.255.255.0;
  range 10.10.10.20 10.10.10.30;
}
We will not discus the complete content here, but feel free to consult ISC DHCP server’s documentation for the details if you wish. Instead, we will just emphasize next two lines that add PXE-specific information to the server’s responses: the TFTP server address and NBP location.
next-server 10.10.10.10;
filename "/pxelinux.0";
All that is left now is to enable and start the DHCP server and open the firewall ports:
# systemctl enable dhcpd
# systemctl start dhcpd
# firewall-cmd --add-service=dhcp
Now we can continue with a TFTP server installation. This is again rather simple process, since TFTP server package is also available in CentOS repos:
# yum install tftp-server
What is even better, the default configuration works just fine here, so we just need to start the tftp service:
# systemctl enable tftp
# systemctl start tftp
# firewall-cmd --add-service=tftp
If you intend to use Ansible to automate the PXE server installation process, make sure you enable
tftp.socket. Enablingtftp.servicewill silently fail .
Last thing to do is to obtain PXELINUX. Gathering all the required binaries
sounds like a tedious task, but CentOS package maintainers have our back once
again, since they provide a syslinux-tftpboot package with all the right
things placed in all the right places:
# yum install syslinux-tftpboot
If nothing went awry during the installation and configuration process, we are now a proud owners of a fully functional PXE server. There is just one thing left to do before we can test drive our PXE server: add operating system files to the server.
Giving pixies something to do
Now that our pixies have settled in their new home, we can start teaching them to do some chores around the castle. And serving operating system kernels is a great warm-up task. But we need to add some kernels before the pixies can serve them.
Adding new operating system to PXE server is usually done in three steps:
- Download the installation source (usually ISO image).
- Place the kernel and possibly also initial RAM disk into TFTP folder.
- Edit or add a PXELINUX menu file that uses newly added files.
To demonstrate the process, we will add CentOS 7 files to the PXE server. We will start by downloading the ISO image and placing it into the TFTP server’s folder:
# curl -o centos.iso \
    http://centos.t-2.net/7.6.1810/isos/x86_64/CentOS-7-x86_64-NetInstall-1810.iso
# mkdir /tmp/centos-iso
# mount -o loop centos.iso /tmp/centos-iso
# mkdir /var/lib/tftpboot/centos76
# cp /tmp/centos-iso/images/pxeboot/{vmlinuz,initrd.img} /var/lib/tftpboot/centos76
# umount /tmp/centos-iso
This being out of the way, we can create
/var/lib/tftpboot/pxelinux.cfg/default file, containing menu entry for our
newly added CentOS 7:
default menu.c32
prompt 0
timeout 300
ontimeout local

menu title PXE Boot Menu

label centos76
menu label centos76 Install CentOS 7.6
kernel centos76/vmlinuz
append initrd=centos76/initrd.img method=http://mirror.centos.org/centos/7/os/x86_64 devfs=nomount
And this is basically all there is to it. If we power on a computer that can access our PXE server, we should be able to boot into CentOS 7 installation program.
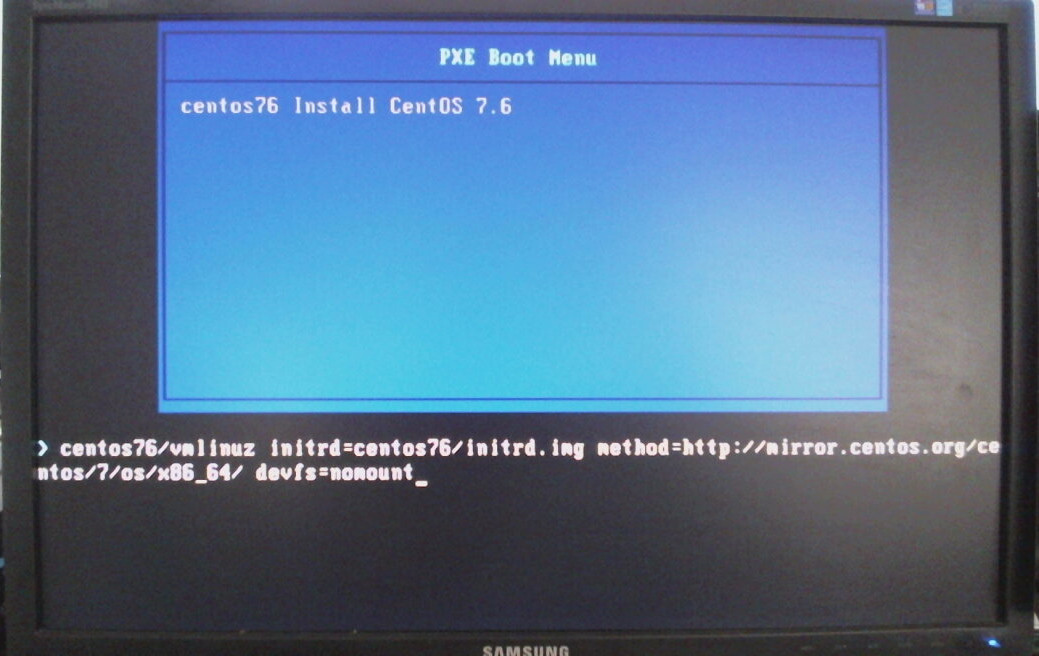
Sample PXELINUX boot screen, taken with high quality potato ;)
Man, we are on fire today! ;)
Obedience course level 1 completed
Congratulations to all of you who managed to get this far: your pixies should be reasonably well behaved by now. But we can train them to do even more and play nice with ManageIQ . But this is something that we will tackle in one of our next posts.
In the mean time, feel free to nag us on Twitter and/or Reddit . Or even send us an angry email that will keep us steaming hot during long winter nights ;)
Oh, and by the way, PXE is most commonly pronounced as pixie. Does the content of this blog post make more sense now? Maybe we should mention that detail a bit sooner ;)
Cheers!

